Before our first house even closed I had insomnia for weeks. I lay in bed every night going over every inch of our soon to be house, creating an endless list of everything I wanted to update. I knew the kitchen needed to be done first. The 70's cream chipping cabinets, bisque fridge, avocado sink, and gold and green flecked countertops were hideous. Half the drawers didn't work, many were off their tracks leaving saw dust on the ground from the constant rubbing.
The problem was we were putting every dime towards our down payment. Contracting it out wasn’t an option. So I I starting searching every inexpensive DIY kitchen remodel I could find. Pinterest and I became dear friends. Through my research I came across this youtube concrete tutorial video.
http://www.youtube.com/watch?v=t7leWebt_xM
After watching them turn basic concrete into gorgeous granite-looking countertops, I was sold. With this method for a fraction of the cost, I could get the high end granite/ marble counter top that I dreamed of. Further research revealed that concrete had its perks. The only problem? I had never worked with concrete in my life. Never held a trowel, never even mixed grout. But heck- if they can do it so can I- right??? Regardless, I went for it!
Inspiration

Here are our before and afters. Comment if you have questions.
Before

Here is the original countertop in all its dingy 70‘s glory. We removed this countertop. (However, you can do this whole process over your existing countertop if you like your depth and layout.)

We hired a friend to build the counter base/ frame. He build out the two corners on either side of the sink so they are no longer 90 degree angles but rather diagonal. The results were dramatic. Not only does the kitchen look more custom, it also feels much larger! I decreased the overhang between the peninsula and the wall oven and increased the overhang for the bar. In order to get the stately solid look we wanted, we increased the depth of the countertop to about 4 inches.

Here I am finishing up the two layers of concrete overlay. (If you look where I am standing you can see how we turned that corner into a diagonal.) This is a day and a half process. You first apply the bond coat and let it dry and then you apply the marble coat. The challenge is trying to get the concrete to be as smooth as glass. I ended up sanding more then I planed to get my desired finish.
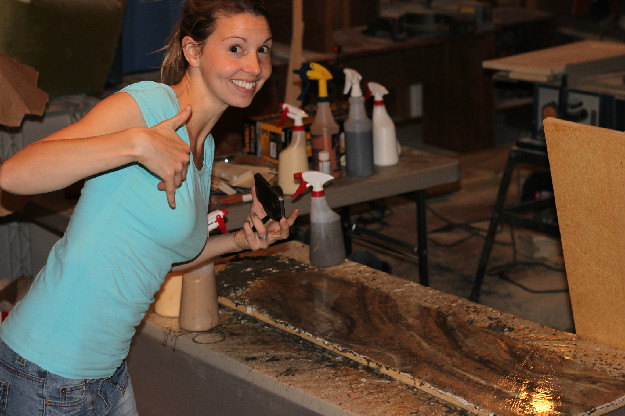
This is the painting step. Most of the painting is done with spray bottles, followed by sea sponges and paint brushes. It's a messy process and my kitchen walls looked like a child's splatter paint project for 6 months. I wanted the painting to be perfect and very realistic so this took me three full 8 hour days trying to get it right. It still isn't perfect but I've come to love that about it. It is truly a one of a kind countertop.
The sealant was the hardest part and what I'm least happy with. Because the sealant hardens quickly, getting a smooth-as-glass surface, VERY stressful. We have several dimples and defects in our finish but overlooking its flaws we love love love it.
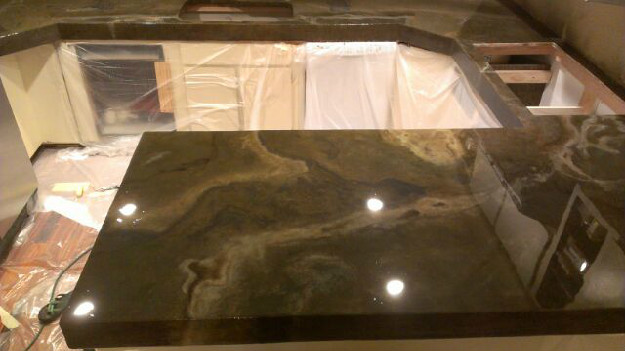
Final product. Isn’t she a beauty!
Again, here’s what we started with:

Here’s what it looks like today:


Cost? Even with the expensive training course I purchased, plus the materials and tools, we spent about what we would have paid for the lowest grade laminate to be installed. This price included my two practice bathroom counter tops. (here is a link to those posts).


1 comment:
Great job! What a project, you are amazing and brave for taking it on. Your kitchen doesn't even look like the same kitchen!
Post a Comment